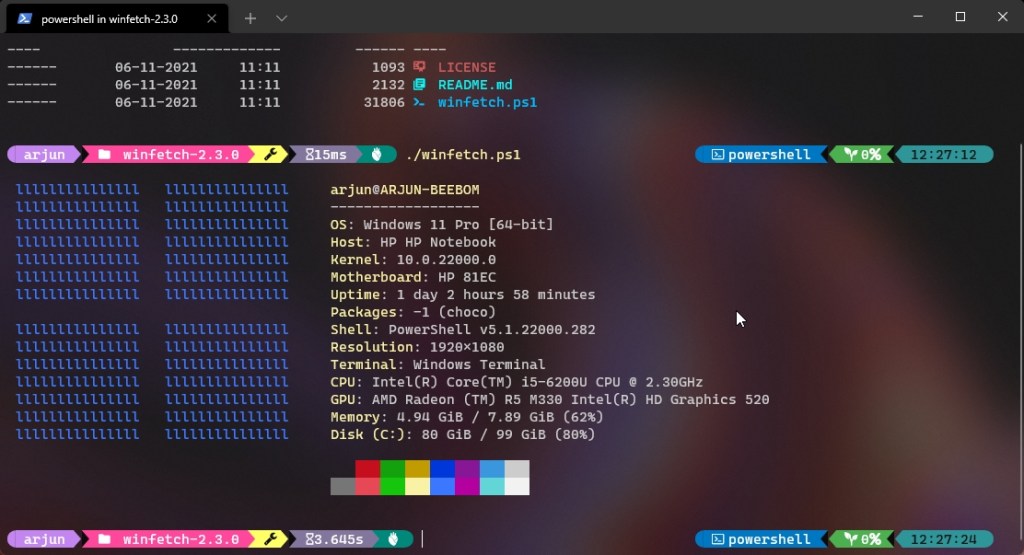
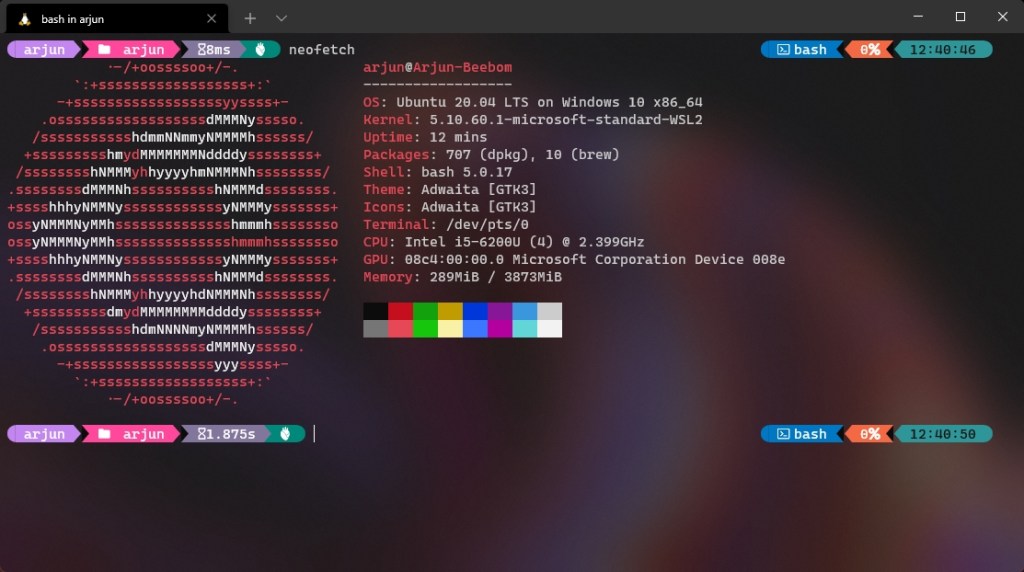
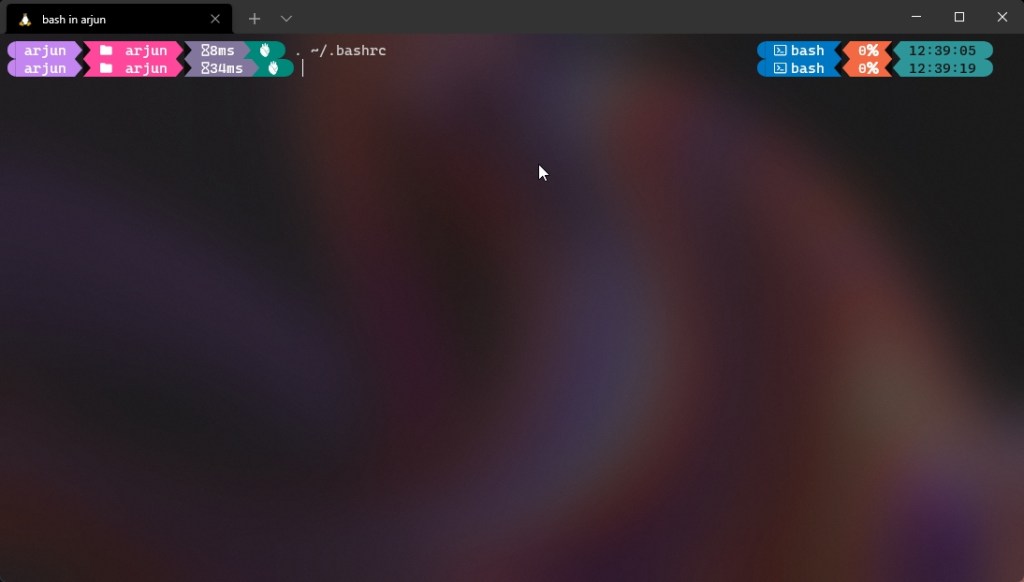
For developers or anyone who uses Windows Terminal to interact with the shell, be it PowerShell or WSL, this tutorial is going to help you customize the Terminal, which will soon be the default command line experience in Windows 11. With the help of a popular prompt theme engine called Oh My Posh, you can make your shell look beautiful with icons, glyphs, colors, and more. I must thank Scott Hanselman, who demonstrated all the nitty-gritties of how to customize the Windows Terminal in Windows 10/ 11 and make it look interesting. So without any further delay, let’s get started and learn how to customize the Windows Terminal in Windows 10/ 11.

Customize Windows Terminal Like a Pro (2022)

We have detailed instructions to customize Windows Terminal, ranging from how to add the acrylic effect to applying the Caskaydia font to your command line experience. We have added steps for both PowerShell and Ubuntu (WSL). You can expand the table below and move to any section you want.

Table of Contents 

Apply Acrylic Effect to Windows Terminal in Windows 10/ 11

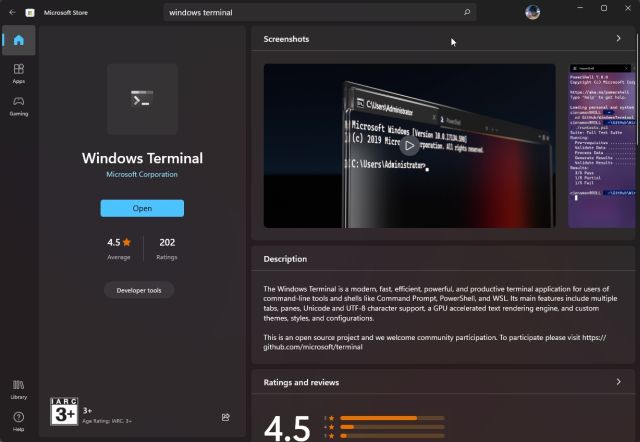
1. First, open Microsoft Store and update Windows Terminal to the latest version.
Add Acrylic Effect to Windows Terminal

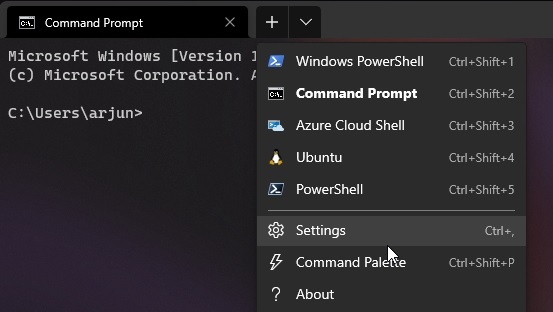
2. Next, open Windows Terminal and move to Settings.
windows terminal settings

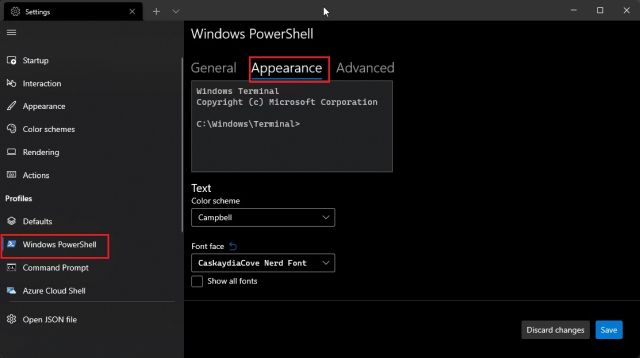
3. Here, move to “Windows PowerShell” under “Profiles” from the left sidebar and switch to the “Appearance” tab.
Add Acrylic Effect to Windows Terminal

4. Scroll down and enable the “Acrylic” toggle. Right below, you can adjust the Acrylic opacity too. I have kept it at 70%, but you can set the value to your own liking. Finally, click on “Save” to confirm the changes. You have successfully taken your first step to customize the Windows Terminal.
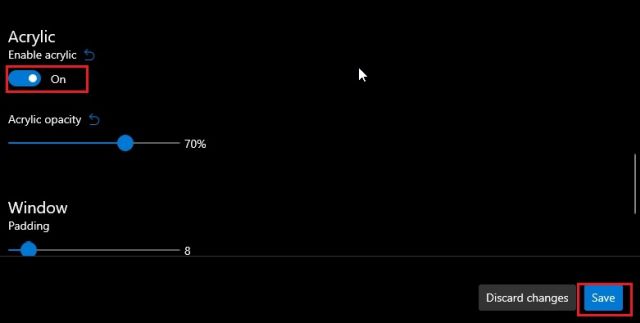
Add Acrylic Effect to Windows Terminal

5. Repeat the process for CMD, WSL, and other shells you use on your Windows computer. It will add an Acrylic effect to the Windows Terminal.
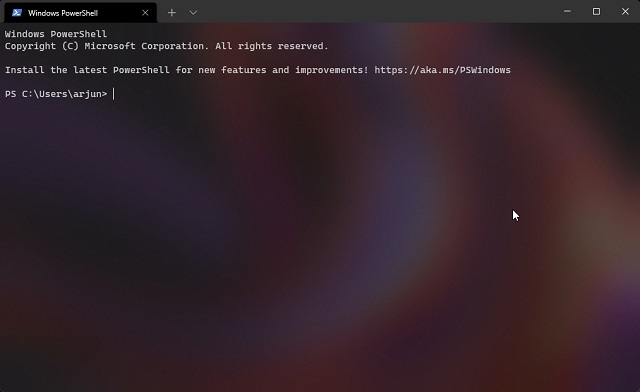
How to Customize Windows Terminal Like a Pro

Add Caskaydia Cove Font to Windows Terminal

1. After adding the Acrylic effect, you need to install fonts compatible with Oh My Posh. I have installed Caskaydia Cove Nerd Font, which works well with this third-party customization tool. You can click here to download the font.
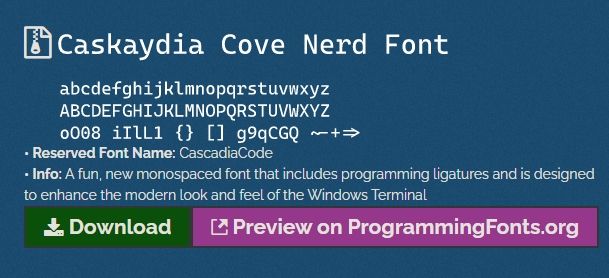
Apply Caskaydia Cove Font to Windows Terminal

2. After downloading the font, unzip it using apps like 7Zip or WinZip, and install all fonts. You can select all the fonts -> right-click on them -> Show more options -> Install for all users.
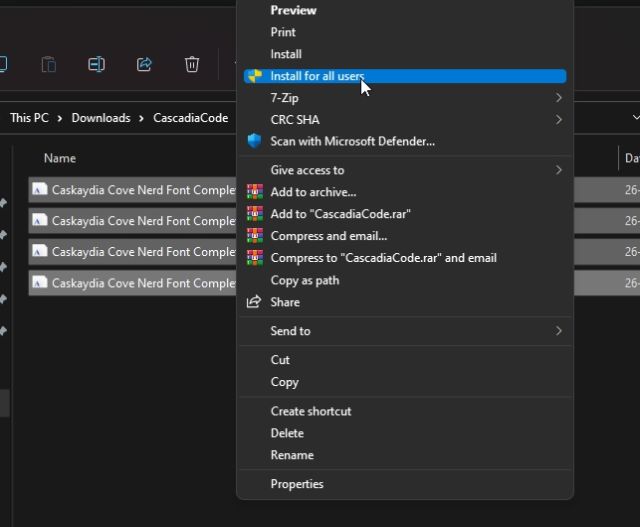
Apply Caskaydia Cove Font to Windows Terminal

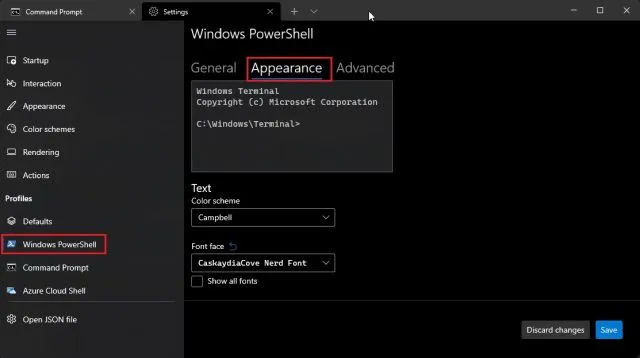
3. Now, open Windows Terminal and move to the Settings. Here, switch to the “Windows PowerShell” section from the left pane and move to the “Appearance” tab just like we did above.
Apply Caskaydia Cove Font to Windows Terminal

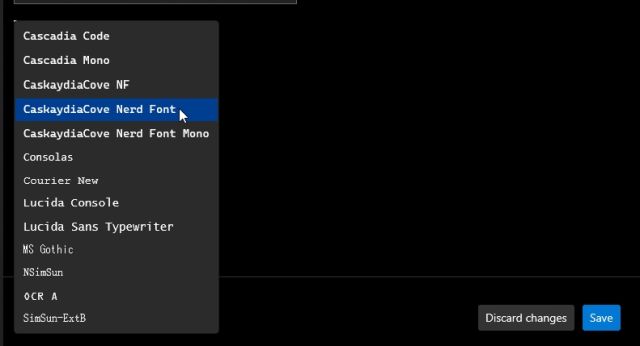
4. Here, choose the newly-downloaded font you want to use with the Oh My Posh prompt. I have selected “Caskaydia Cove Nerd Font“. Now, click on “Save”.
Apply Caskaydia Cove Font to Windows Terminal

5. Repeat this process for all the shells you are using on Windows 10/ 11, including WSL/Ubuntu.

Customize PowerShell in Windows Terminal With Oh My Posh

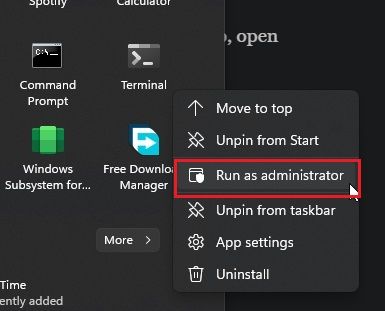
1. Now that you have added the Acrylic effect and applied a compatible font, it’s time to install the Oh My Posh prompt. To do so, open Windows Terminal with administrator privileges. To do that, search for Terminal after pressing the Windows key and click the “Open as administrator” option in the right pane.
Customize PowerShell in Windows Terminal With Oh My Posh

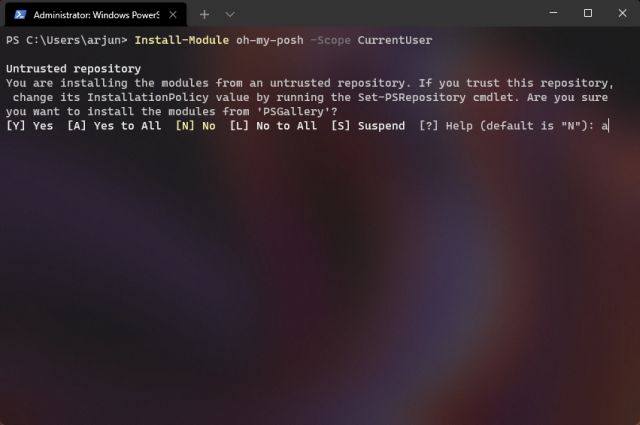
2. Move to the PowerShell window and run the below command to install the Oh My Posh prompt. Post that, press “A” and hit Enter to allow the installation.

Install-Module oh-my-posh -Scope CurrentUser
Customize PowerShell in Windows Terminal With Oh My Posh

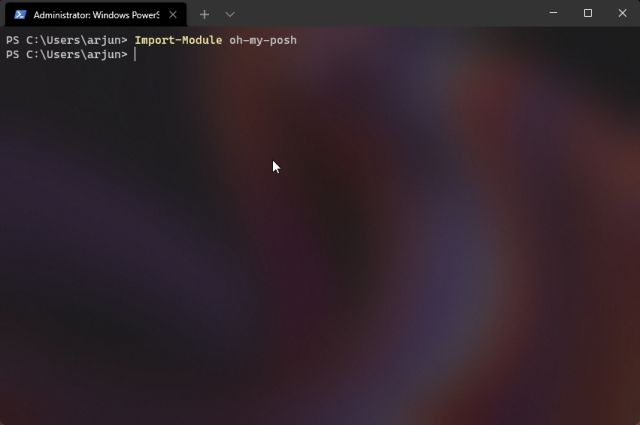
3. Next up, execute the below command to import the Oh My Posh profile. If you get any prompt, press “A”, followed by “Enter” to proceed with the installation.

Import-Module oh-my-posh
Customize PowerShell in Windows Terminal With Oh My Posh

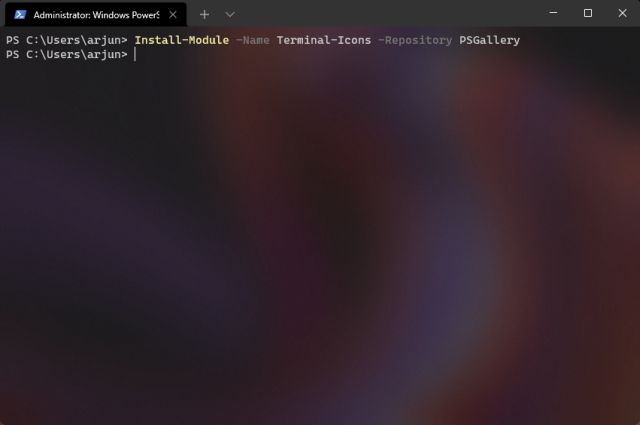
4. After that, you need to install Terminal Icons. Shout out to Brandon Olin, who developed Terminal Icons for PowerShell. Just run the below command and allow for the installation to complete. Make sure you are running Windows Terminal with admin privileges before you run this command.

Install-Module -Name Terminal-Icons -Repository PSGallery 
Customize PowerShell in Windows Terminal With Oh My Posh

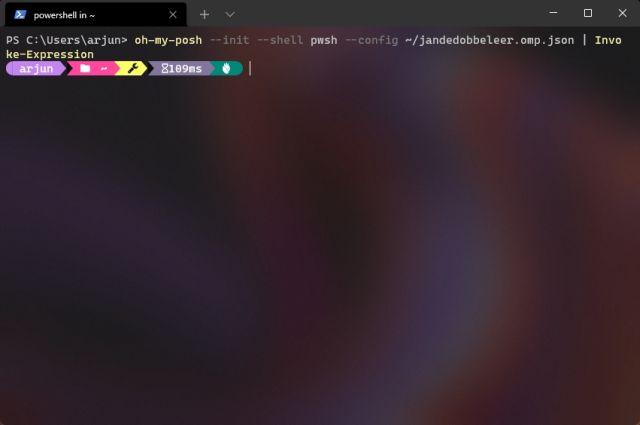
5. Now to check if everything is running fine, execute the command below. This will bring up the new prompt.

oh-my-posh --init --shell pwsh --config ~/jandedobbeleer.omp.json | Invoke-Expression
Customize PowerShell in Windows Terminal With Oh My Posh

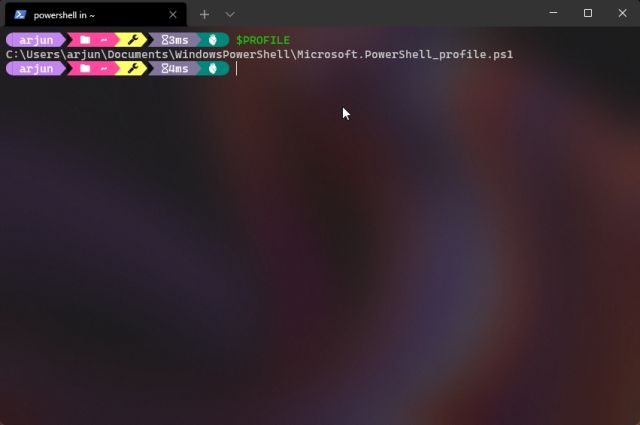
6. So far, everything is running fine, but you need to make Oh My Posh your default custom prompt. To do that, run the below command. It will give you a path, which you need to note down or copy-paste in Notepad.

$PROFILE
Customize PowerShell in Windows Terminal With Oh My Posh

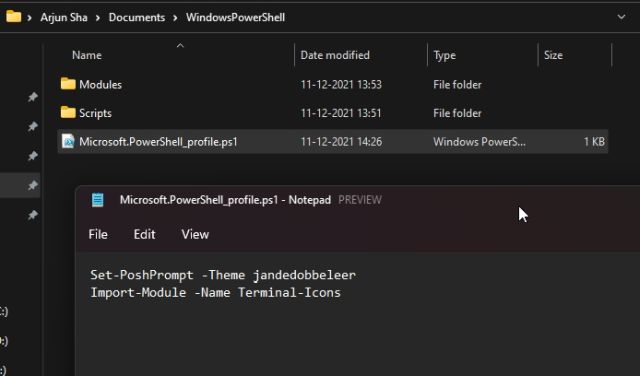
7. Next, navigate to that path, and you will find a “Microsoft.PowerShell_profile.ps1” file. Open it with Notepad, add the below lines, and save the file. Now, you can close the Notepad file.

Set-PoshPrompt -Theme jandedobbeleer
Import-Module -Name Terminal-Icons
Customize PowerShell in Windows Terminal With Oh My Posh

Note: If the Microsoft.PowerShell_profile.ps1 file does not exist in that location, follow the next step.

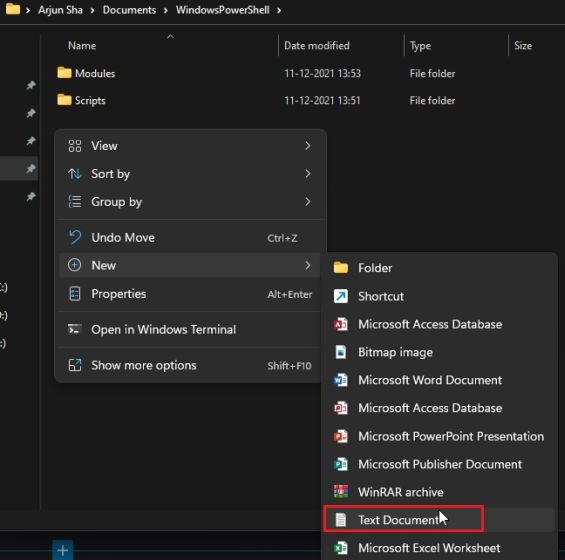
8. In case the ps1 file is not there, you can easily create one. Right-click in the “WindowsPowerShell” folder and choose New -> Text Document.
Customize PowerShell in Windows Terminal With Oh My Posh

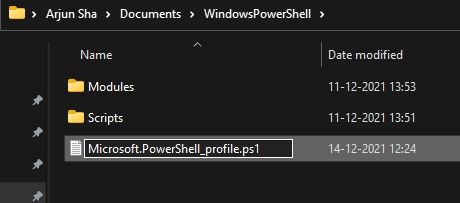
9. Rename it to Microsoft.PowerShell_profile.ps1. Make sure there is no .txt extension at the end. The file name should end with .ps1.
Customize PowerShell in Windows Terminal With Oh My Posh

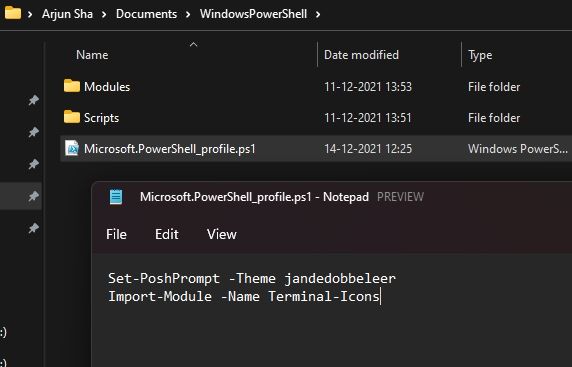
10. Now, open the file with Notepad and add the below two lines and save it. You can close the Notepad now.

Set-PoshPrompt -Theme jandedobbeleer
Import-Module -Name Terminal-Icons
Customize PowerShell in Windows Terminal With Oh My Posh

11. Move back to the PowerShell window and run the below command to reload the profile.

. $PROFILE
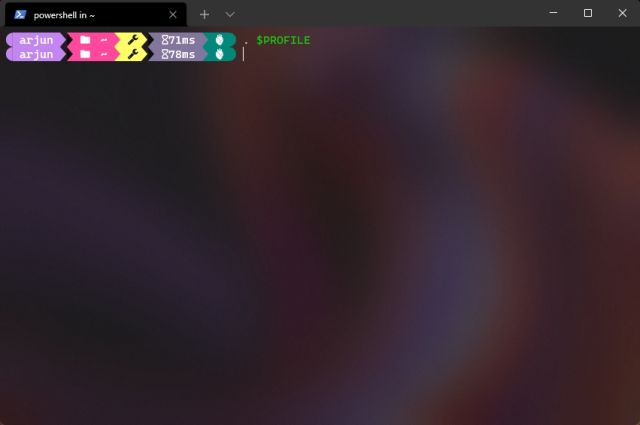
Customize PowerShell in Windows Terminal With Oh My Posh

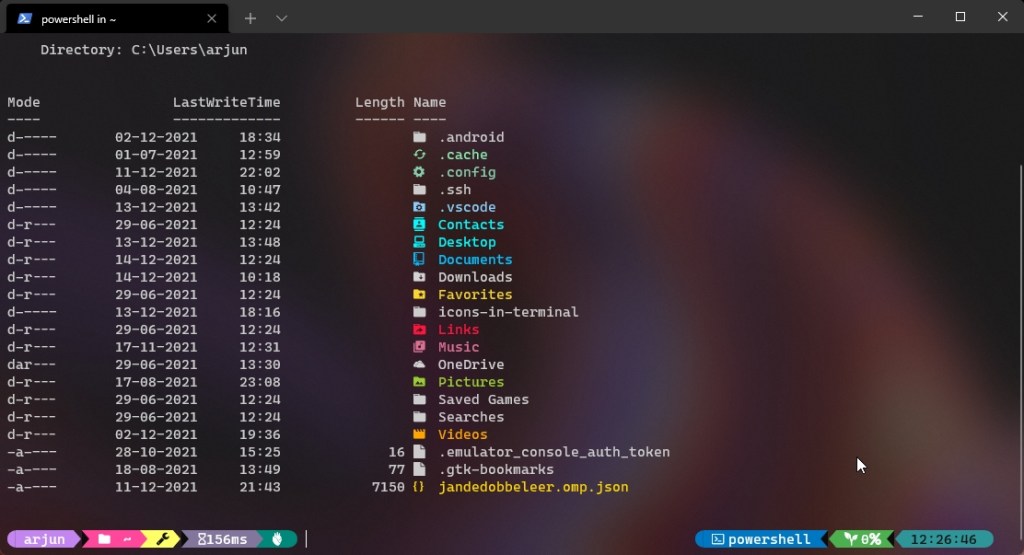
12. Finally, close Windows Terminal and re-open it. You will now find that Oh My Posh is set as the default prompt in PowerShell. With the Acrylic effect, new fonts, icons, glyphs, and the Oh My Posh prompt, PowerShell in Windows Terminal looks beautiful.

  • How to Customize Windows Terminal Like a Pro
How to Customize Windows Terminal Like a Pro

Customize WSL/Ubuntu in Windows Terminal With Oh My Posh

Once you have added the Acrylic effect and installed the fonts, it’s time to customize WSL with Oh My Posh. Here is how to go about it.

1. Open Windows Terminal with admin privileges.

Customize PowerShell in Windows Terminal With Oh My Posh

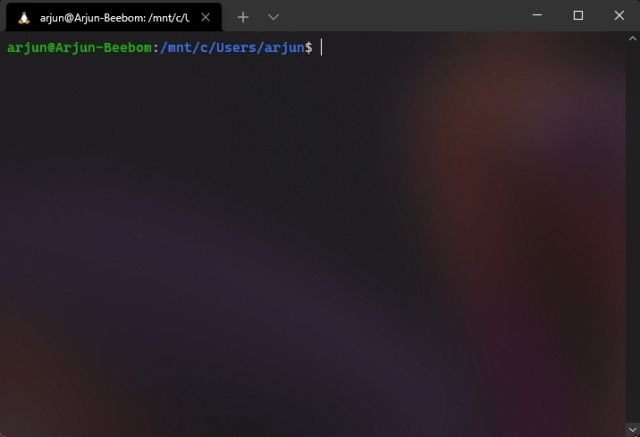
2. Next up, move to WSL (Ubuntu or any other distro that you have installed).
Customize WSL/Ubuntu in Windows Terminal With Oh My Posh

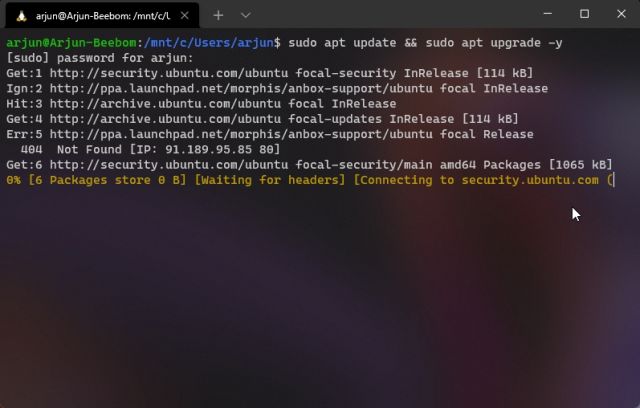
3. Now, before we install Oh My Posh, we recommend updating WSL to the latest packages and dependencies. You may have to enter WSL’s password to confirm the installation.

sudo apt update && sudo apt upgrade -y
Customize WSL/Ubuntu in Windows Terminal With Oh My Posh

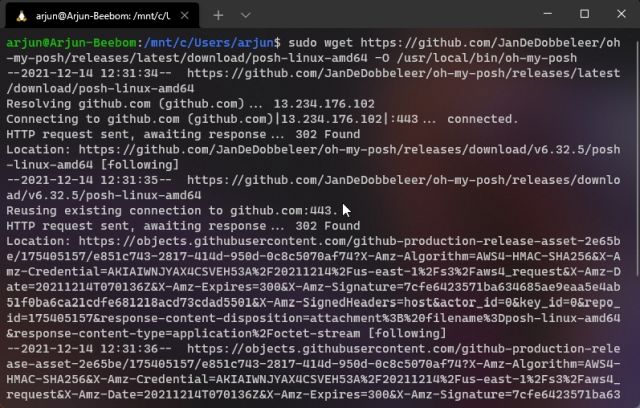
4. After that, run the below commands one by one to install Oh My Posh in WSL to enable yourself to customize Windows Terminal. You will have to press “y” to allow the installation.

sudo wget https://github.com/JanDeDobbeleer/oh-my-posh/releases/latest/download/posh-linux-amd64 -O /usr/local/bin/oh-my-posh
sudo chmod +x /usr/local/bin/oh-my-posh
Customize WSL/Ubuntu in Windows Terminal With Oh My Posh

5. Next up, run the below commands one by one to download the themes.

mkdir ~/.poshthemes
wget https://github.com/JanDeDobbeleer/oh-my-posh/releases/latest/download/themes.zip -O ~/.poshthemes/themes.zip
unzip ~/.poshthemes/themes.zip -d ~/.poshthemes
chmod u+rw ~/.poshthemes/*.json
rm ~/.poshthemes/themes.zip
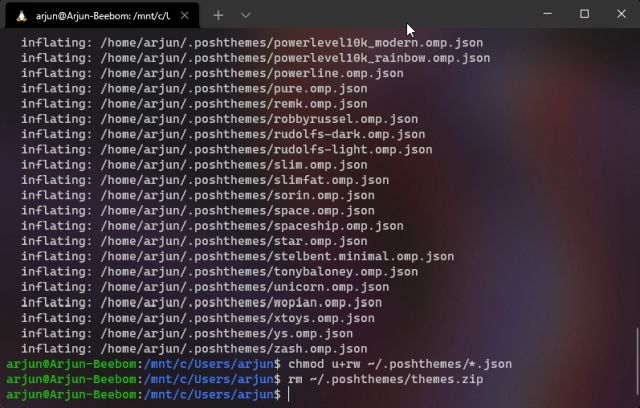
Customize WSL/Ubuntu in Windows Terminal With Oh My Posh

6. Having done that, execute the below command to check if the custom prompt is installed properly. This should bring up the new Oh My Posh prompt.

eval "$(oh-my-posh --init --shell bash --config ~/.poshthemes/jandedobbeleer.omp.json)"
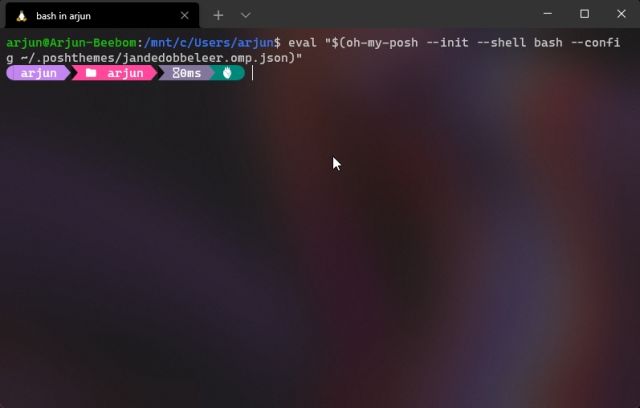
Customize WSL/Ubuntu in Windows Terminal With Oh My Posh

7. Now, to set Oh My Posh as your default prompt in WSL, run the below command. It will allow you to edit the Bash config file in Nano editor.

nano ~/.bashrc
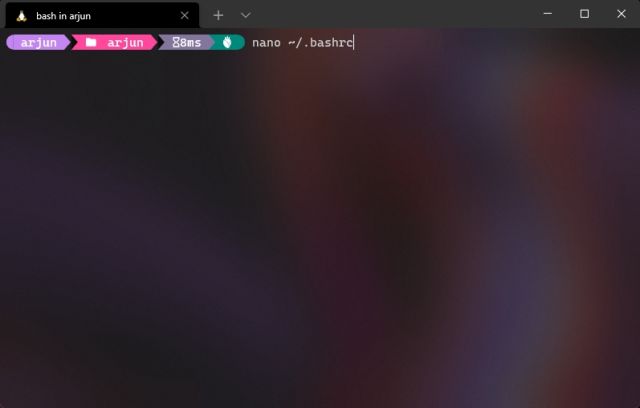
Customize WSL/Ubuntu in Windows Terminal With Oh My Posh

8. In the Nano editor, scroll down using the keyboard arrow keys and look for this line “make less more friendly for non-text input files, see lesspipe(1)”. Right below it, you need to replace the command beginning with “eval…”.
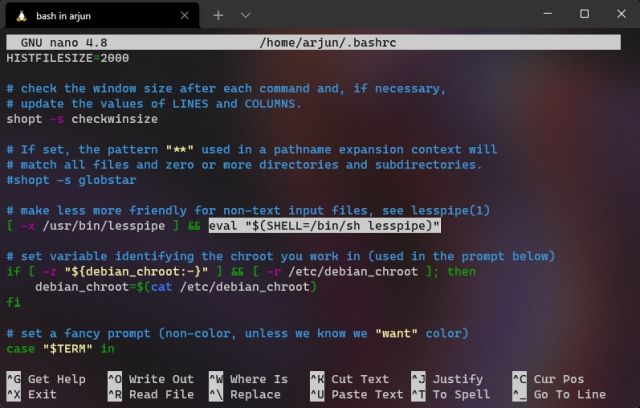
Customize WSL/Ubuntu in Windows Terminal With Oh My Posh

9. Now, you need to type the below command in the Nano editor since it does not support copy and paste. It will look like this:

eval "$(oh-my-posh --init --shell bash --config ~/.poshthemes/jandedobbeleer.omp.json)"
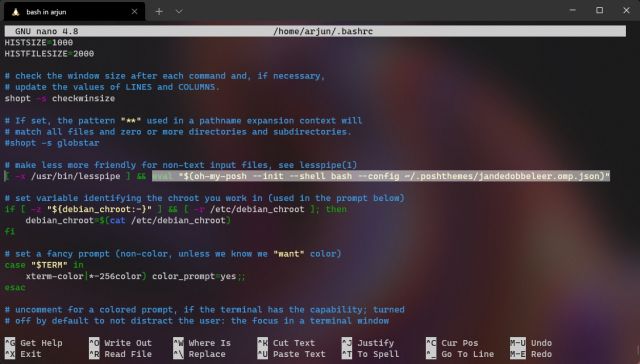
Customize WSL/Ubuntu in Windows Terminal With Oh My Posh

10. After that, press “Ctrl + O” and hit Enter to save the changes. Next, press “Ctrl + X” to exit the Nano editor.

Customize WSL/Ubuntu in Windows Terminal With Oh My Posh

11. Finally, run the below command to reload the Bash profile. From now on, the WSL will load in the Oh My Posh prompt. Enjoy!

. ~/.bashrc
  • How to Customize Windows Terminal Like a Pro
How to Customize Windows Terminal Like a Pro

12. In case there are some glitches in rendering the glyphs and text, make sure you have set the right Caskaydia Cove Nerd font for Ubuntu/ other distros in the Settings page of Windows Terminal. This is one of the first things you need to customize in the Windows Terminal.
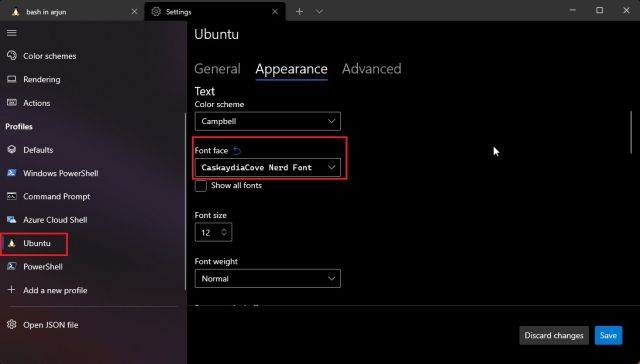
Customize WSL/Ubuntu in Windows Terminal With Oh My Posh

13. If you are still facing the issue, you need to reload the Bash profile every time you enter the WSL shell. Run the below command and everything will be fixed. You can also restart your PC to check if the issue has been fixed.

 . ~/.bashrc 
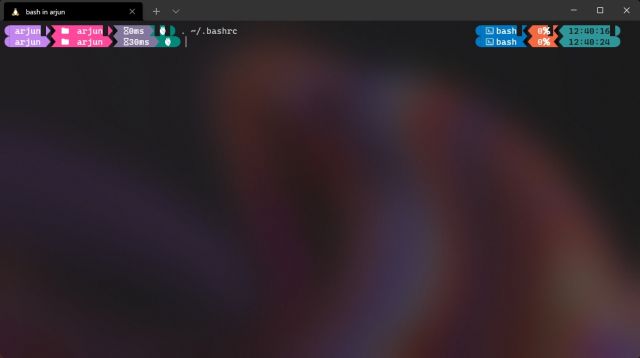
Customize WSL/Ubuntu in Windows Terminal With Oh My Posh

Make Your Windows Terminal Look Beautiful With Oh My Posh

So that is how you can customize Windows Terminal and make it look advanced and beautiful with icons, glyphs, acrylic effect, and more. As for the Command Prompt, we did try making it work with Clink but were unsuccessful. Anyway, that is all from us. If you want to further personalize Windows Terminal with themes, background images, and colors, follow our linked article. And if you have any questions, let us know in the comments section below.

 

redmi note launch in india

Xiaomi is on a phone-launching spree in India! After launching the Xiaomi 11i Hypercharge and sharing the Xiaomi 11T Pro launch date, the company has now teased the launch of a new Redmi Note, possibly belonging to the Redmi Note 11 series, in the country. Here’s what we expect from this upcoming Redmi smartphone.

A new Redmi Note Coming to India Soon

Redmi India’s official Twitter handle has started teasing the launch of a new Redmi Note smartphone. The teaser doesn’t reveal the name of the phone but has highlighted the “X,” “I,” and “Note,” suggesting that the phone will be a part of the Redmi Note 11 lineup.

Another easter egg is the tagline of the teaser, which reads “New Note 1S Coming.” This gives us an inkling that it will be most likely the Redmi Note 11S. The phone will join the existing Redmi Note 11T 5G and will succeed last year’s Redmi Note 10S.

The teaser also gives a glimpse of the design. From the looks of it, we can expect the phone to have a rectangular rear camera hump with big camera housings, much like the Redmi Note 11T 5G. The front could most likely have a punch-hole screen.

While details on the Redmi Note 11S remain unknown, it is reported that the phone has been spotted on various certification sites. The smartphone could feature either an AMOLED or an LCD display with support for a high refresh rate. It could be powered by a MediaTek chipset and fall in the affordable price range.

Rumors also hint at 108MP cameras for the device. The main 108MP snapper could have a Samsung HM2 sensor. It could be accompanied by an ultra-wide camera and a macro camera. The upcoming Redmi Note 11S smartphone could also support fast charging, 5G, and more.

Since we are yet to get more details on this, it’s best to wait and see what to expect. Keep reading Beebom.com for more information.


iphone 14 pro mock up

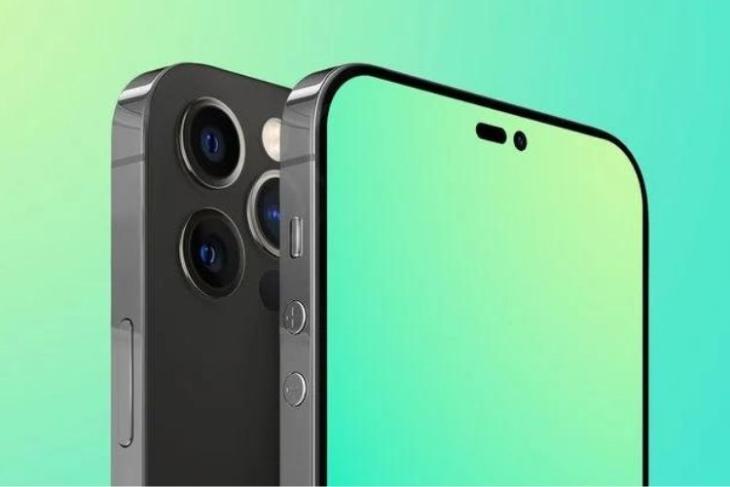
Ever since we saw rumors around the 2022 iPhone 14 lineup, one thing that we have heard the most is that Apple will ditch the notch and go for a punch-hole screen, or a pill-shaped notch, for that matter. While past rumors have been in line with this, the latest information is slightly different. The latest report hints at an iPhone 14 Pro with a combination of “hole and pill” display. Here’s how it looks like!

The Start of a New Display Trend?

Popular analyst Ross Young reports that the iPhone 14 Pro and 14 Pro Max will go for a ‘hole+pill’ design, leading to a new display design. This, Young suggests, will be unique to Apple, much like how the notch was and won’t be anything like the punch-hole screens seen on Android phones. Here’s what the front panel on the next-gen iPhone might look like:

If this is what Apple is going for this year, it might prove to be a start of a new display design trend, which might find its way to future Android phones too. Remember how the notch was copied? Plus, it can help Apple accommodate all the necessary Face ID sensors and the front camera without having a space crunch. And, the notch will go away too!

Although, there are high chances that Apple will stick to the notch for the non-Pro models, the iPhone 14 and iPhone 14 Max. This year, we are most likely to not see an iPhone mini.

For those who don’t know, this isn’t the first time we have heard about this unique iPhone design. Last year, an unknown Twitter account posted an image, which showcased a similar design. There are high chances that Apple might go for this as a major design upgrade for the iPhone lineup this year. But, this rumor still needs to be taken with a grain of salt for we don’t have any official details available as of now.

In other news, another leak suggested that the iPhone 14 Pro might get just a pill-shaped cutout. It remains to be seen what Apple chooses!

As for other iPhone 14 details, it is expected to come in four variants: the 6.1-inch iPhone 14, iPhone 14 Max, the iPhone 14 Pro, and the 6.7-inch iPhone 14 Pro Max. These new iPhones are expected to come with various camera improvements with the inclusion of 48MP cameras, the A16 Bionic chipset, bigger batteries, possible support for USB Type-C ports, 5G (obviously!), and loads more.

We can expect to see them launch toward the end of this year and more rumors and leaks until the launch officially takes place. Hence, stay tuned for more information on the 2022 iPhone 14 series. Also, don’t forget to share your views on the iPhone 14 Pro’s leaked design in the comments below!


CES 2022: Watch BMW's New iX Flow Prototype Car Change Its Color in an Instant!

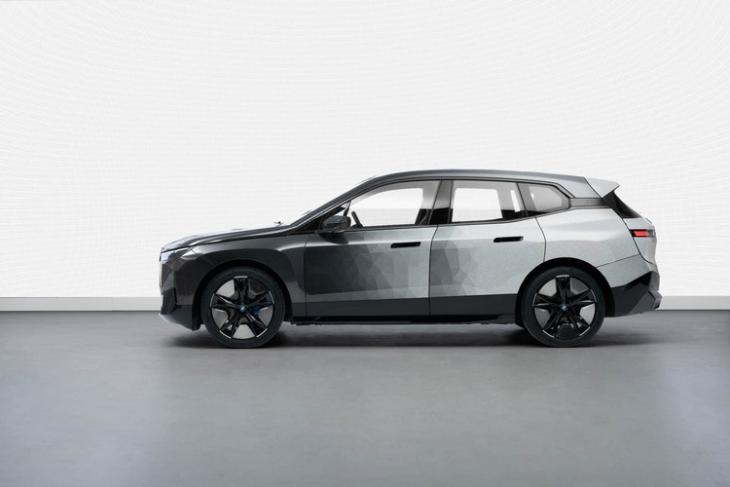
Would you like it if you could change your car’s color with the press of a button? Sounds unreal, doesn’t it? Well, German automaker BMW doesn’t think so, and at this year’s CES event, it has showcased a car named BMW iX Flow with its newly developed color-changing technology. The car uses the company’s in-house E Ink tech that enables it to change color on the fly. Here’s how all this happens.

BMW iX Flow with Color-Changing Body Panels

In an official blog post, BMW reveals that the iX Flow features an E-Ink prototype technology that relies on electrical signals for the process. The new color-changing system uses electrophoretic technology to change the pigment of its surface when stimulated with these electrical signals. It is a similar technology that is used in eReaders like Amazon’s Kindle devices.

BMW iX Flow Prototype Car that Change Its Color

“Digital experiences won’t just be limited to displays in the future. There will be more and more melding of the real and virtual. With the BMW iX Flow, we are bringing the car body to life,” says Frank Weber, the current CEO of the company and a member of the board.

A tweet by Out of Specs Studio showcases the color-changing technology on BMW iX Flow in action. Here’s a look:

Currently, the electrophoretic-based E Ink technology can only change from white to black and vice-versa, using negatively charged white pigments and positively charged black pigments. Furthermore, the new E Ink technology can also change the color of individual body panels of the car, giving it a dual-tone look. Just imagine, you leave the house in a white SUV, and come back home in a stealthy-looking greyish-black one. How cool would that be?

This technology will allow people to give their car different looks, designs, and patterns as per their preference or “mood of the day.” But, it also has pretty practical use cases.

For instance, as white does not absorb much heat, drivers can set the color of the car to white in hot regions and reduce the usage of air conditioning. In winters, they can change the car to black to absorb more heat from the surroundings, reducing the need for the in-car heating system. Additionally, the change of colors can reduce the amount of energy consumed by the car’s electrical system, and thus, its fuel consumption.

BMW iX Flow Prototype Car that Change Its Color

As for the availability of the color-changing car, BMW finds it difficult to answer that question, despite it being attractive and useful at the same time. Hence, the company will take some time to further develop its E-Ink technology before applying it to its commercial vehicles.

What do you think about this concept car? Would you like a color-changing car for yourself? Let us know your thoughts in the comments below and stay tuned for more