Showing posts with label how to. Show all posts

Since the launch of Windows 11, enthusiasts have been trying to run the new Microsoft OS on almost everything. Many have even tried to run Windows 11 on the single-board Raspberry Pi computer. And thanks to the efforts of a developer who goes by the name of Botspot, we can now install Windows 11 or Windows 10 on Raspberry Pi. You don’t need to get your hands dirty with too many commands or technical skills if you follow this process. So in this tutorial, we bring you a straightforward guide on how to install Windows 11/ 10 on Raspberry Pi. You will be able to run official Windows on ARM (Pro edition) on your Raspberry Pi. So without any delay, let’s jump right in.

Install Windows 11/ 10 on Raspberry Pi (2021)

We have detailed the steps to install Windows 11/10 on Raspberry Pi in this guide. You can install Windows on Raspberry, even on RPi 3 and RPi 2 boards, but we suggest running Windows on Raspberry Pi 4 with at least 4GB of RAM. You can expand the table below and go through the requirements and instructions at your own pace.

Table of Contents 

Requirements to Run Windows on Raspberry Pi

1. You need a USB thumb drive, an SD card, or an SSD drive with 32GB or more storage. If you have external storage of 16GB space, the installation process will take more time. The external drive is only required to create the Windows on Raspberry image.

2. You need Ubuntu or any other Debian-based Linux distro to flash the Windows-on-Raspberry (WoR) OS. I am using Raspberry Pi OS (download here) installed on a secondary drive on my PC to flash the image. You can even use Raspberry Pi OS on your Raspberry Pi to flash the image, but it will take much longer due to the low-powered CPU.

3. The Raspberry Pi 4/ 3/ 2, Raspberry Pi 400, and RPi CM3 boards are compatible with Windows on Raspberry. You need at least 16GB of SD card attached to your Raspberry Pi.

Create Windows on Raspberry Image

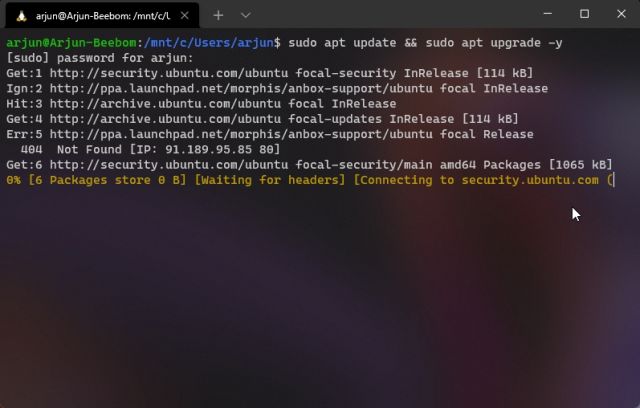
1. On your Linux distro of choice, open the Terminal. I am using Raspberry Pi OS on my PC, but you can also use Ubuntu or any other Debian-based OS. In the Terminal, you first paste the below command to update all the packages and dependencies. Make sure you don’t get any errors while applying the apt update command. Note that you may have to enter your password to update the system.

sudo apt update && sudo apt upgrade -y
Create Windows on Raspberry Image

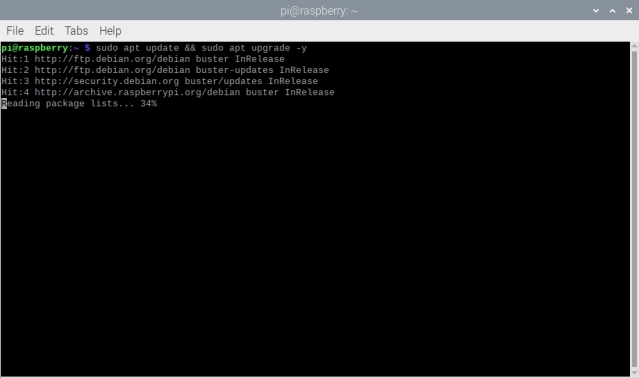
2. Next, run the below command to install Git in case you haven’t already.

sudo apt install git
Create Windows on Raspberry Image

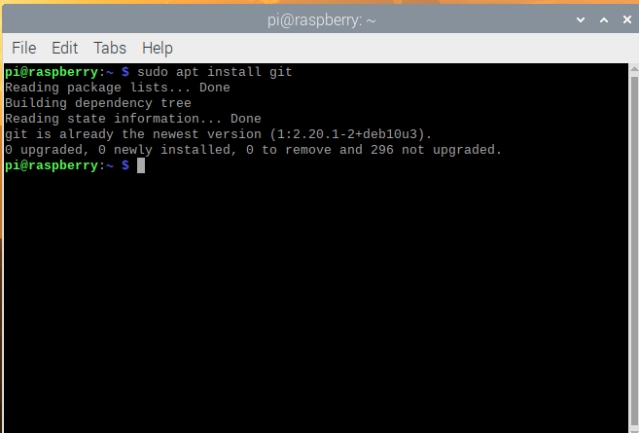
3. Having done that, execute the below command in the Terminal to download wor-flasher.

git clone https://github.com/Botspot/wor-flasher
Create Windows on Raspberry Image

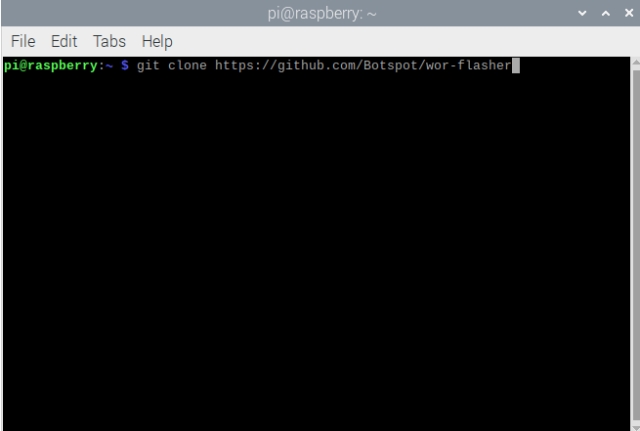
4. After that, execute the below command to run the script. It’s a GUI script that lets you customize and flash the Windows-on-Raspberry image onto the SD card/ USB drive/ SSD drive. Note that you may have to press “Y” a couple of times during the process to confirm the installation changes.

~/wor-flasher/install-wor-gui.sh
Create Windows on Raspberry Image

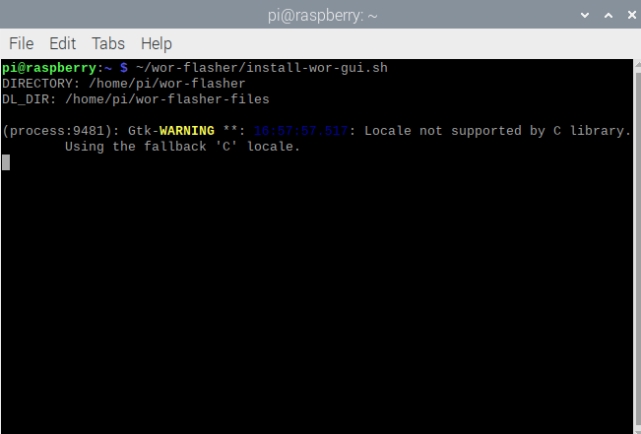
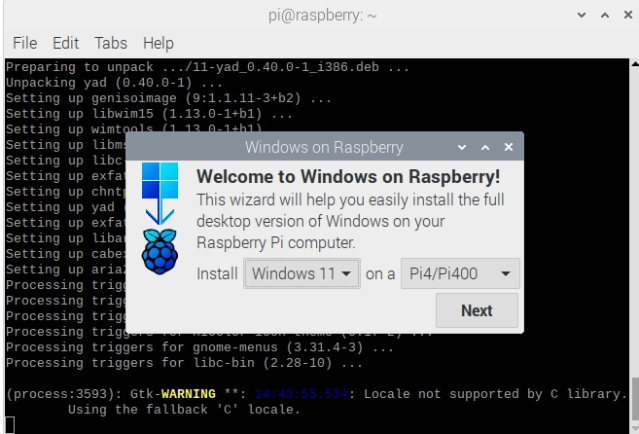
5. Then, a Windows on Raspberry prompt will come up on your screen. Here, you can choose whether you want to install Windows 11 or 10 on your Raspberry Pi board. You can also select the RPi board from the drop-down menu in this pop-up prompt. Then, click “Next” and choose the language of the installation.

Install Windows 11/10 on Raspberry Pi

6. At this point, I will suggest connecting the SD card/ USB drive/ SSD drive to your PC. If you are using Raspberry Pi itself to create the image, connect an external USB drive/ SSD drive to the board. Note that if you wish to install Windows 11/ 10 on the same SD card or USB drive, you must have free space of 24GB or more.

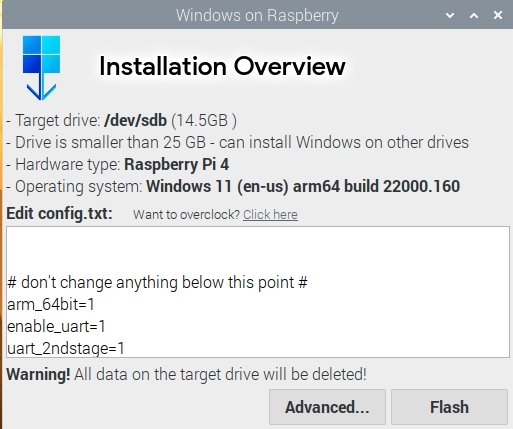
7. Next, choose the external drive where you wish to flash the WoR image. Bear in mind that all files within the external drive will be wiped while installing Windows 11/ 10 on Raspberry Pi, so make sure to take a backup.

Install Windows 11/10 on Raspberry Pi

8. Finally, review all the information and click “Flash” on the Overview window.

Install Windows 11/10 on Raspberry Pi

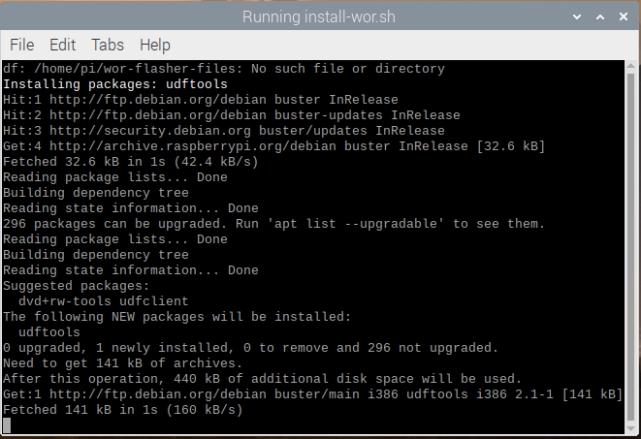
9. A Terminal window will now launch and show you the progress. Here, the script will download Windows on ARM files directly from Microsoft’s server and generate an ISO image. So yeah, maintain patience as the process will take some time. On my PC, it took close to 40 minutes to generate the image. Note that if the screen seems stuck at “ejecting device”, don’t worry, and let it complete the process.

Install Windows 11/10 on Raspberry Pi

10. Once done, a prompt will appear asking you to follow the next steps. That means you have successfully generated the Windows-on-Raspberry image. Now, shut down your Raspberry Pi.

Install Windows 11/10 on Raspberry Pi

How to Boot Windows 11/ 10 on Raspberry Pi

Now that you have flashed the image, it’s time to boot Windows 11/10 on your Raspberry Pi. Follow the steps below to learn how to do that:

1. If you created the image using your PC, unplug the external drive and insert it into your Raspberry Pi using the USB port. Make sure an SD card of 16GB or more is attached to the board.

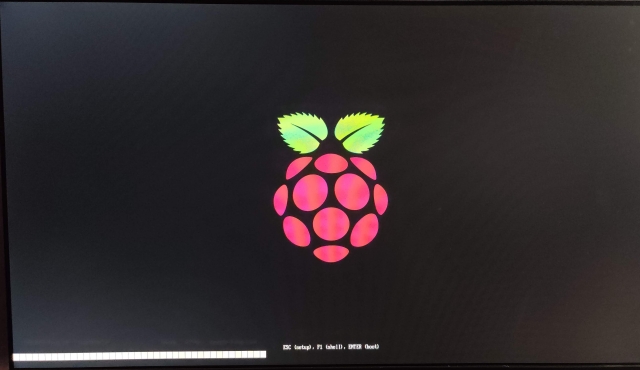
2. Now, power on the board, and you will see the Raspberry Pi logo. After that, the Windows loading sign will appear. Just give it some time, and you will move to the disk selection page. If nothing shows up, remove the SD card and let the board boot from the external drive. I have provided a solution in the next step as to when to insert the SD card.

Boot Windows 11/10 on Raspberry Pi

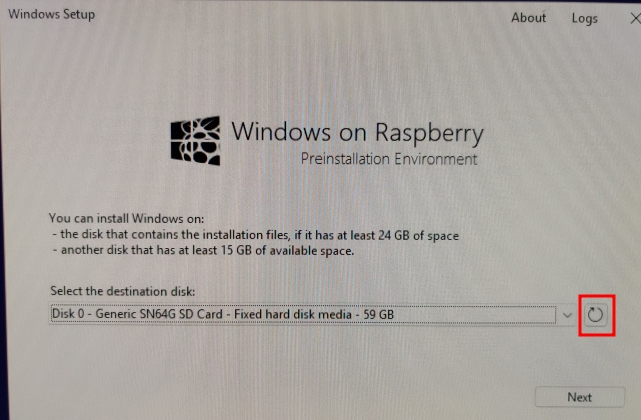
3. On the disk selection page, choose the SD card where you want to install Windows 11/ 10. If the SD card is not showing up, click on the “Refresh” button. In case it’s still not showing up, restart your Raspberry Pi, and insert the SD card right when the RPi logo appears. Now, the SD card will show up in the drop-down menu.

Boot Windows 11/10 on Raspberry Pi

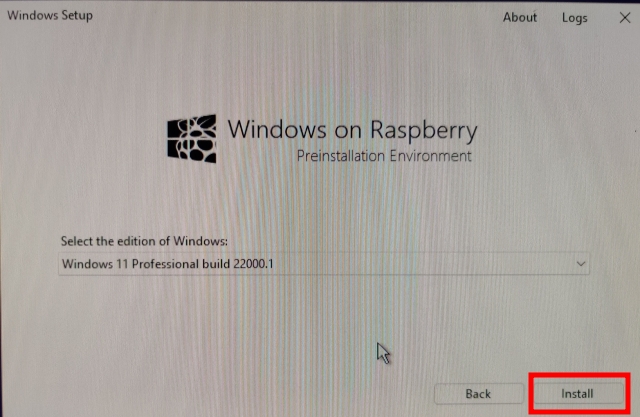
4. Here, select the edition of Windows you want to install and click on “Install“.

Boot Windows 11/10 on Raspberry Pi

5. Note that it will take considerable time to complete the process. It may take up to 45 mins to 1 hour, so don’t think the screen is stuck. Just leave it there, and the process will be completed.

Boot Windows 11/10 on Raspberry Pi

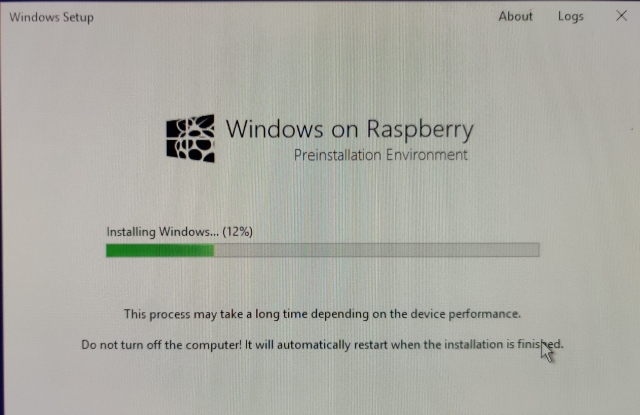
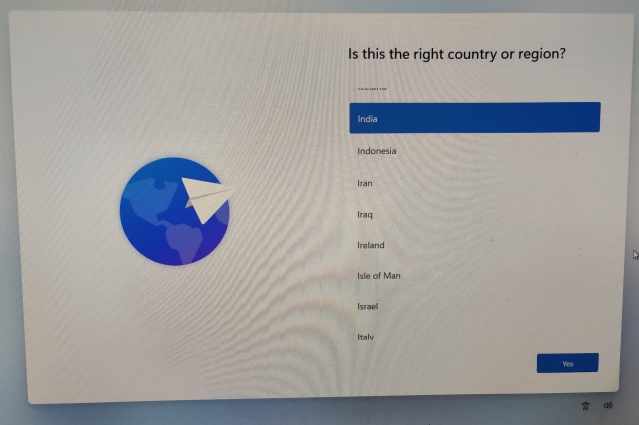
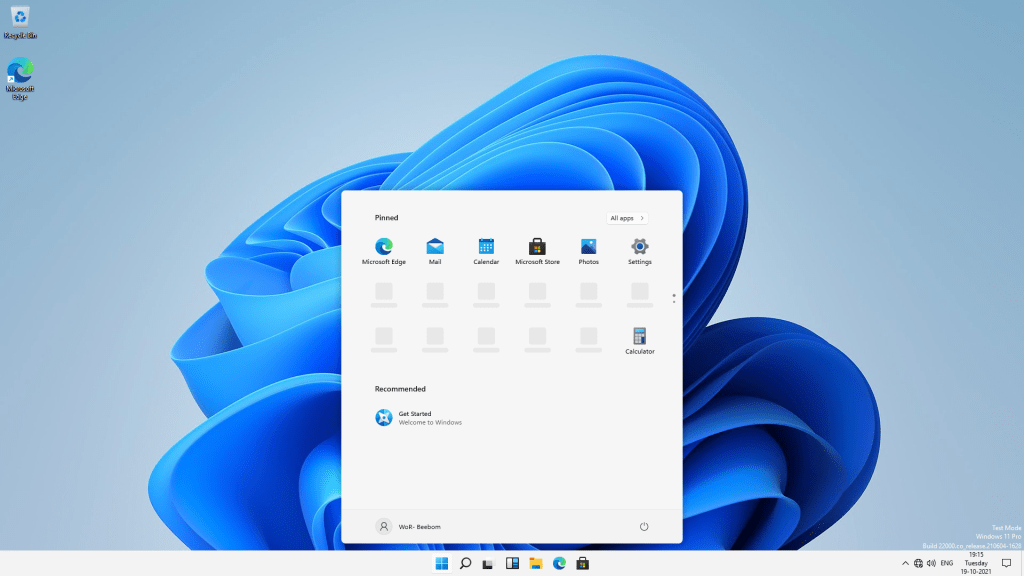
6. The board will reboot several times during the process, just like any other Windows PC. Once everything is done, you will be greeted with Windows 11/ 10’s onboarding setup on your Raspberry Pi.

Windows 11 on raspberry pi 4

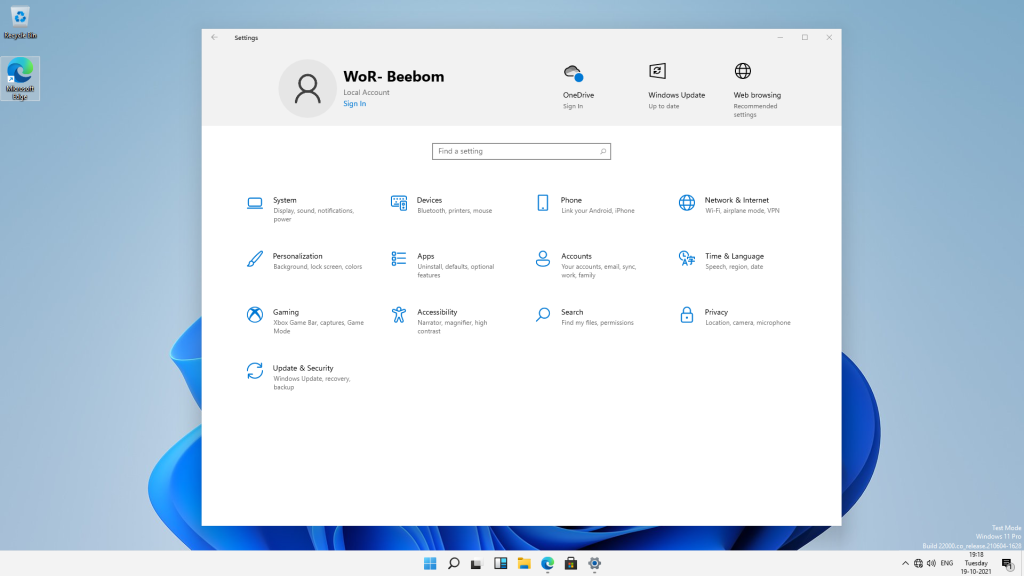
7. Finally, you will boot into Windows 11/ 10. As you would expect, the performance is not great, but it’s usable. Also, note that Wi-Fi does not work as of now, so you will have to use Ethernet to use internet services in Windows 11/ 10 on your Raspberry Pi.

  • How to Install Windows 11/ 10 on Raspberry Pi
How to Install Windows 11/ 10 on Raspberry Pi

Remove RAM Limitation on Windows on Raspberry

There is another issue, though. Due to some technical limitations, the RAM is capped at 3GB even when your board might have 4GB or 8GB of RAM. To fix this, follow the below steps.

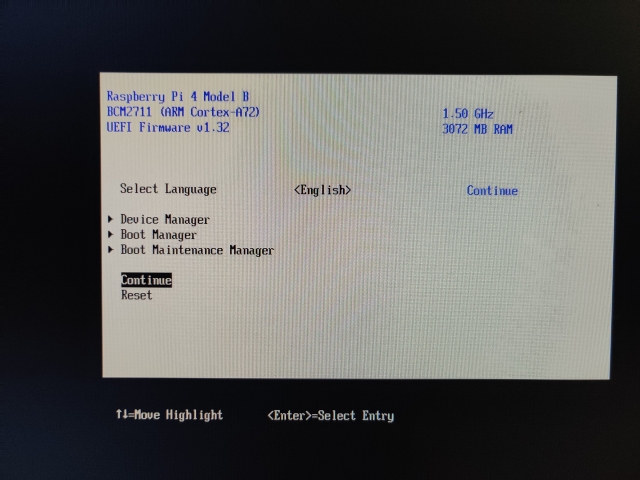
1. Restart Windows on Raspberry as you do on any other PC. Press “Esc” when the Raspberry Pi logo appears. You will enter the setup screen.

Remove RAM Limitation on Windows on Raspberry

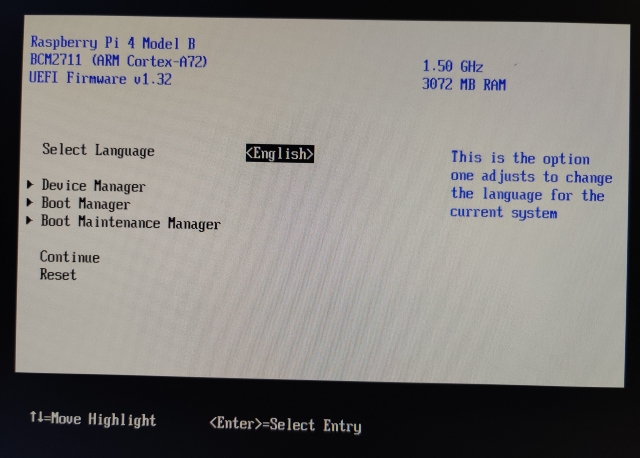
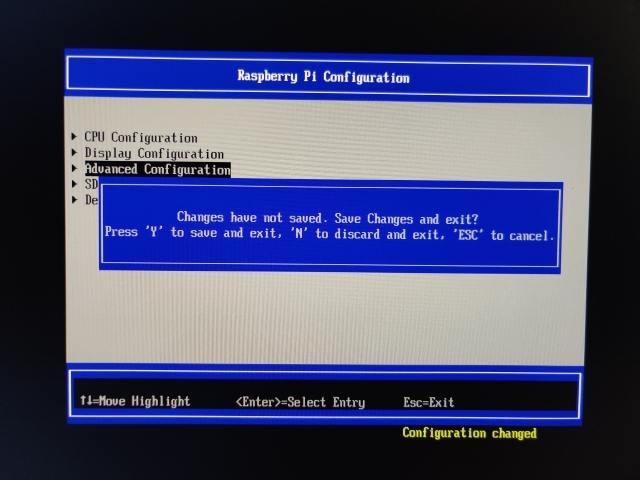
2. Here, move to Device Manager -> Raspberry Pi Configuration ->Advanced Configuration. Now, disable the “Limit RAM to 3GB” option.

Remove RAM Limitation on Windows on Raspberry

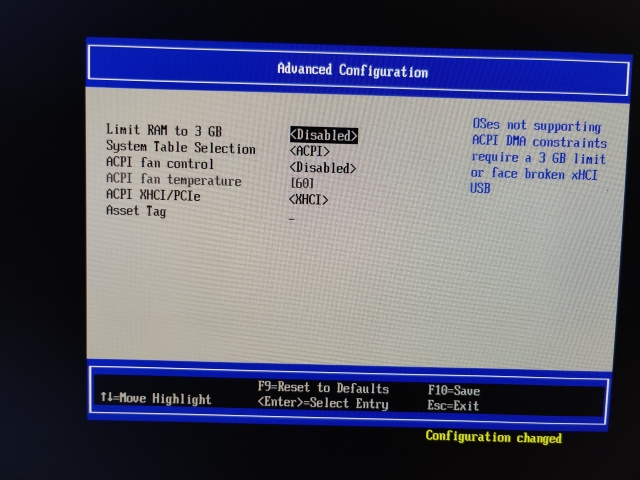
3. After that, keep pressing “Esc” to go back and press “Y” to save the changes.

Remove RAM Limitation on Windows on Raspberry

4. Press “Esc” again to go back to the main setup menu. Then, move to “Continue” at the bottom and hit Enter, and then press Enter again to boot into Windows 11/ 10 on your Raspberry Pi.

Remove RAM Limitation on Windows on Raspberry

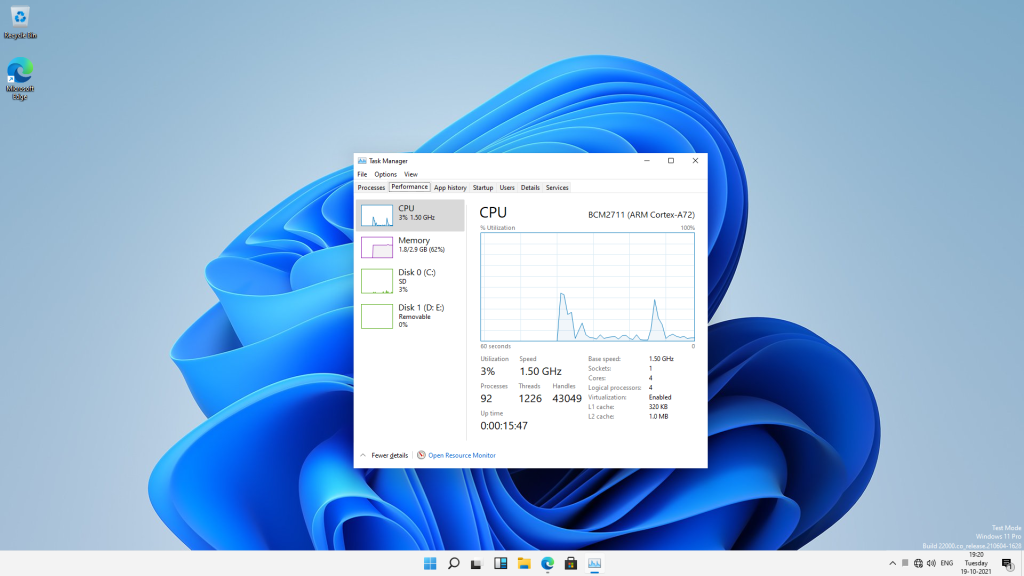
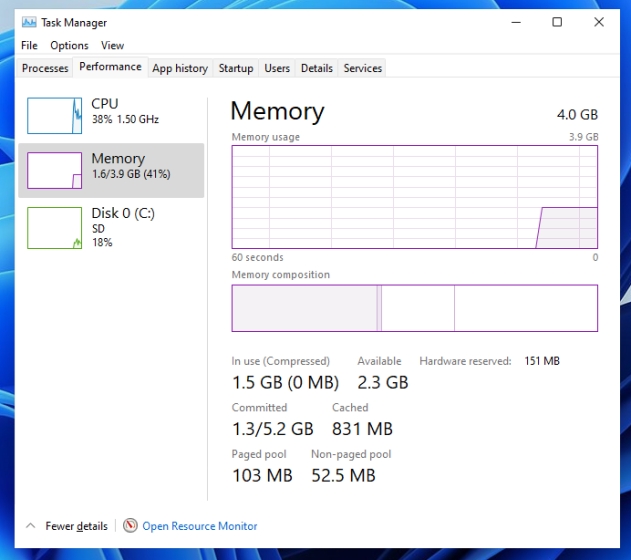
5. Finally, the RAM limitation will be removed on Windows on Raspberry, as shown in the screenshot below.

How to Install Windows 11/ 10 on Raspberry Pi

Run Windows 11 or 10 on Raspberry Pi

So that is how you can install Windows 11 or 10 on Raspberry Pi. As we know, Raspberry Pi runs on an ARM processor, so you will basically be running Windows on ARM on the board. If you are using Windows 11, x86 emulation will be better but don’t expect great performance due to the low-powered processor on Raspberry Pi. Anyway, that is all from us. If you are getting started with Raspberry Pi, go ahead and learn how to set up Raspberry Pi on a Windows laptop without a monitor or ethernet cable. And if you are facing any issues in this tutorial, let us know in the comment section below.

 Thanks to its ability to save plenty of storage space without compromising the image quality, HEIC (also known as HEIF) is the most efficient image format. As part of the smart storage management feature on your iPhone, HEIF has been the default image format since iOS 11. While no one can argue HEIF’s efficiency, it has a long way to go before it can surpass JPEG in terms of compatibility. There are still many platforms that do not support HEIF natively. That means you are forced to convert HEIF pictures into JPEG to make them work with any other software or hardware. So, if you want to use a widely compatible image format for a hassle-free experience, let me show you how to take JPEG pictures on an iPhone instead of HEIC.

Save JPEG Photos Instead of HEIC on iPhone (2022)

Before going through the step-by-step process to take JPEG pictures on iPhone, make sure to check out the difference between HEIC and JPEG image formats, along with the downsides of choosing JPEG. Use the table below to jump directly to the guide.

Table of Contents 

What Is HEIC and JPEG Image Format on iPhone?

When Apple decided to adopt the HEIF file format (introduced in 2015 by Moving Picture Experts Group/ MPEG) with the release of iOS 11, the Cupertino giant coined the name HEIC. That’s how HEIC became the variant of HEIF on iPhones.

Being the first major adopter of the file format, Apple pitched HEIC as a breakthrough feature to iOS users. Equipped with advanced and modern compression methods, HEIC can save pictures in smaller file sizes while still retaining higher image quality. Notably, the HEIC pictures take up about half the space of an equivalent quality JPG file. That means you can store more images on your iPhone if you capture them in HEIC format.

Another thing that separates HEIC from other formats is the ability to store images encoded with multiple coding formats, for instance, both HDR and SDR photos.

Introduced in 1992, JPEG (Joint Photographic Experts Group) is the most commonly used format for lossy and compression for digital images. It’s able to achieve 10:1 compression with little perceptible loss in the quality of images.

How to Take JPEG Pictures on iPhone Instead of HEIC

Despite being more efficient, HEIF is yet to be adopted by all major platforms. To prevent incompatibility from coming in the way, iOS 15 automatically converts pictures stored in the HEIC format into the older JPEG format. When you transfer images from your iPhone to your Mac or Windows PC, make sure to change this setting. (Settings app -> Photos -> Transfer to Mac or PC -> Automatic). The built-in Mail app on iPhone also converts the HEIC pictures to JPEG before sending them to the recipient for enhanced compatibility.

Shortcomings of JPEG Image Format to Keep in Mind

Compatibility aside, not everything about the JPEG image format shines bright. One of the pain points of choosing JPEG is that you are forced to record video in H.264 format, which is below par, to say the least.

Moreover, if you wish to record a 4K video at 60 frames per second (FPS) or capture a slow-motion 1080p video at 240 FPS, you need to switch to High Efficiency. It lets you capture pictures in HEIC (High-Efficiency Image Format) and video in HEVC (High-Efficiency Video Coding, also known as H.265) format, respectively.

In a nutshell, it all boils down to excellent efficiency vs unmatched compatibility. As to which one should you choose, it entirely depends on your specific needs. That’s why Apple offers a pretty simple way to switch between the two in iOS.

Take JPEG Pictures Instead of HEIC by Default on iPhone

Note that steps are the same for current-gen iOS 15 and previous-gen versions of Apple’s operating system, including iOS 14 and iOS 13. So, irrespective of which version of iOS you are using, learn how to take JPEG pictures instead of HEIC on iPhone right here:

1. Open the Settings app on your iPhone. After that, scroll down and open the “Camera” settings.

Choose Camera in iOS Settings

2. Now, select the “Formats” option at the top.

How to Take JPEG Pictures on iPhone Instead of HEIC

3. Next, you will have two options to choose from:

  • High Efficiency: It allows you to capture photos and videos in the high efficiency HEIF (image) and HEVC (video) format.
  • Most Compatible: It lets iPhone users take photos in JPEG and video in H.264 format, respectively.
Shoot images in JPEG format on iPhone

4. Select Most Compatible under the “Formats” settings, and you are all set! Going forward, your iPhone will always click pictures in JPEG or H.264 (in case of video) format instead of HEIC (or HEVC). If you ever wish to revert your selection, repeat the same steps and choose “High Efficiency” as the format.

Set JPEG as the Default Image Format on Your iPhone

So that wraps up our guide on how to set JPEG as the default format for clicking pictures on iPhone instead of HEIC. As I said above, you should pick it on a need basis, especially when compatibility is at the top of your mind. It would have been better there was a way to set JPEG and HEVC as the default image and video format, respectively. The freedom to choose the preferred format without being forced to pick either compatibility or efficiency would be the better way to go. Take notes, Apple! What do you think of the easy option to switch between JPEG and HEIC formats? Let me know your thoughts in the comments below.

 Startup sound has always been an iconic element in operating systems to quickly identify the OS version. After teasing the arrival of a new startup sound with a slo-fi remix of all Windows startup sounds until date, Microsoft chose to bring back startup sound in Windows 11. If you haven’t heard it yet, listen to the soothing and short new Windows 11 startup sound right here. Now, if you don’t like this sound or you are someone who prefers waking up their PC silently instead, here’s how you can disable startup sound in Windows 11.

Disable Startup Sound in Windows 11 (2022)

We have included three methods to silence startup sound in Windows 11. Needless to say, the easiest way to disable Windows 11 startup sound is through the Settings app. That said, let’s get to the steps involved to do that.

Table of Contents 

Disable Windows 11 Startup Sound from Sound Settings

  1. Open the Settings app using the Windows 11 keyboard shortcut “Win+I”, switch to the “Personalization” tab from the left sidebar, and choose “Themes”.
personalization themes

2. From the Themes settings screen, click on “Sounds”.

sounds settings

3. When the “Sound” dialog box opens up, uncheck the “Play Windows Startup sound” option. Windows 11 will no longer play the new startup sound when you switch on the computer.

play windows startup sound

Stop Windows 11 Startup Sound from Group Policy Editor

Another way to disable Windows 11 startup sound is through Group Policy Editor. While Group Policy Editor (gpedit.msc) is available by default in the Pro, Enterprise, and Education editions of Windows 11, you can choose to enable Group Policy Editor on Windows 11 Home Edition from our linked guide. With that said, here’s how to go about it:

  1. Press the Windows key, type “run”, and click “Open” from the search results.
open run w11

2. When the Run box appears, type “gpedit.msc” and click “OK”.

gpedit w11

3. Now, navigate to the following path and double-click on “Turn off Windows Startup sound” in the right pane.

Computer Configuration\Administrative Templates\System\Logon
turn off windows startup sound w11

4. From the pop-up window that appears, choose “Enabled” and click “OK” or “Apply” to confirm the changes. Once you have done that, restart your PC, and you will no longer hear the Windows 11 startup sound.

set turn off startup sound as enabled to disable startup sound in Windows 11

Turn Off Windows 11 Startup Sound from Registry Editor

1. Press the Windows key, type “regedit” in Windows Search, and click “Open”.

open registry editor w11

2. Navigate to the path shown below and double-click on “DisableStartupSound” in the right pane.

HKEY_LOCAL_MACHINE\SOFTWARE\Microsoft\Windows\CurrentVersion\Authentication\LogonUI\BootAnimation
disablestartupsound regedit

3. By default, the value data will be set to “1”. Change it to “0”, click “OK”, and restart the machine to start your Windows 11 system silently going forward.

change value data to disable startup sound in Windows 11

Easily Silence Startup Sound in Windows 11

While most Windows fans appreciate the resurrection of startup sound in Windows 11, you can choose to turn it off in case it bothers you or disrupts your workflow. For more such tips, do not forget to read our article on the best Windows 11 settings you should change for a better experience. You can also speed up Windows 11 and make it more snappy by following the steps in our linked guide. Anyway, if you have any queries, do let us know in the comments section below.

 For developers or anyone who uses Windows Terminal to interact with the shell, be it PowerShell or WSL, this tutorial is going to help you customize the Terminal, which will soon be the default command line experience in Windows 11. With the help of a popular prompt theme engine called Oh My Posh, you can make your shell look beautiful with icons, glyphs, colors, and more. I must thank Scott Hanselman, who demonstrated all the nitty-gritties of how to customize the Windows Terminal in Windows 10/ 11 and make it look interesting. So without any further delay, let’s get started and learn how to customize the Windows Terminal in Windows 10/ 11.

Customize Windows Terminal Like a Pro (2022)

We have detailed instructions to customize Windows Terminal, ranging from how to add the acrylic effect to applying the Caskaydia font to your command line experience. We have added steps for both PowerShell and Ubuntu (WSL). You can expand the table below and move to any section you want.

Table of Contents 

Apply Acrylic Effect to Windows Terminal in Windows 10/ 11

1. First, open Microsoft Store and update Windows Terminal to the latest version.

Add Acrylic Effect to Windows Terminal

2. Next, open Windows Terminal and move to Settings.

windows terminal settings

3. Here, move to “Windows PowerShell” under “Profiles” from the left sidebar and switch to the “Appearance” tab.

Add Acrylic Effect to Windows Terminal

4. Scroll down and enable the “Acrylic” toggle. Right below, you can adjust the Acrylic opacity too. I have kept it at 70%, but you can set the value to your own liking. Finally, click on “Save” to confirm the changes. You have successfully taken your first step to customize the Windows Terminal.

Add Acrylic Effect to Windows Terminal

5. Repeat the process for CMD, WSL, and other shells you use on your Windows computer. It will add an Acrylic effect to the Windows Terminal.

How to Customize Windows Terminal Like a Pro

Add Caskaydia Cove Font to Windows Terminal

1. After adding the Acrylic effect, you need to install fonts compatible with Oh My Posh. I have installed Caskaydia Cove Nerd Font, which works well with this third-party customization tool. You can click here to download the font.

Apply Caskaydia Cove Font to Windows Terminal

2. After downloading the font, unzip it using apps like 7Zip or WinZip, and install all fonts. You can select all the fonts -> right-click on them -> Show more options -> Install for all users.

Apply Caskaydia Cove Font to Windows Terminal

3. Now, open Windows Terminal and move to the Settings. Here, switch to the “Windows PowerShell” section from the left pane and move to the “Appearance” tab just like we did above.

Apply Caskaydia Cove Font to Windows Terminal

4. Here, choose the newly-downloaded font you want to use with the Oh My Posh prompt. I have selected “Caskaydia Cove Nerd Font“. Now, click on “Save”.

Apply Caskaydia Cove Font to Windows Terminal

5. Repeat this process for all the shells you are using on Windows 10/ 11, including WSL/Ubuntu.

Customize PowerShell in Windows Terminal With Oh My Posh

1. Now that you have added the Acrylic effect and applied a compatible font, it’s time to install the Oh My Posh prompt. To do so, open Windows Terminal with administrator privileges. To do that, search for Terminal after pressing the Windows key and click the “Open as administrator” option in the right pane.

Customize PowerShell in Windows Terminal With Oh My Posh

2. Move to the PowerShell window and run the below command to install the Oh My Posh prompt. Post that, press “A” and hit Enter to allow the installation.

Install-Module oh-my-posh -Scope CurrentUser
Customize PowerShell in Windows Terminal With Oh My Posh

3. Next up, execute the below command to import the Oh My Posh profile. If you get any prompt, press “A”, followed by “Enter” to proceed with the installation.

Import-Module oh-my-posh
Customize PowerShell in Windows Terminal With Oh My Posh

4. After that, you need to install Terminal Icons. Shout out to Brandon Olin, who developed Terminal Icons for PowerShell. Just run the below command and allow for the installation to complete. Make sure you are running Windows Terminal with admin privileges before you run this command.

Install-Module -Name Terminal-Icons -Repository PSGallery 
Customize PowerShell in Windows Terminal With Oh My Posh

5. Now to check if everything is running fine, execute the command below. This will bring up the new prompt.

oh-my-posh --init --shell pwsh --config ~/jandedobbeleer.omp.json | Invoke-Expression
Customize PowerShell in Windows Terminal With Oh My Posh

6. So far, everything is running fine, but you need to make Oh My Posh your default custom prompt. To do that, run the below command. It will give you a path, which you need to note down or copy-paste in Notepad.

$PROFILE

Customize PowerShell in Windows Terminal With Oh My Posh

7. Next, navigate to that path, and you will find a “Microsoft.PowerShell_profile.ps1” file. Open it with Notepad, add the below lines, and save the file. Now, you can close the Notepad file.

Set-PoshPrompt -Theme jandedobbeleer
Import-Module -Name Terminal-Icons
Customize PowerShell in Windows Terminal With Oh My Posh

Note: If the Microsoft.PowerShell_profile.ps1 file does not exist in that location, follow the next step.

8. In case the ps1 file is not there, you can easily create one. Right-click in the “WindowsPowerShell” folder and choose New -> Text Document.

Customize PowerShell in Windows Terminal With Oh My Posh

9. Rename it to Microsoft.PowerShell_profile.ps1. Make sure there is no .txt extension at the end. The file name should end with .ps1.

Customize PowerShell in Windows Terminal With Oh My Posh

10. Now, open the file with Notepad and add the below two lines and save it. You can close the Notepad now.

Set-PoshPrompt -Theme jandedobbeleer
Import-Module -Name Terminal-Icons
Customize PowerShell in Windows Terminal With Oh My Posh

11. Move back to the PowerShell window and run the below command to reload the profile.

. $PROFILE
Customize PowerShell in Windows Terminal With Oh My Posh

12. Finally, close Windows Terminal and re-open it. You will now find that Oh My Posh is set as the default prompt in PowerShell. With the Acrylic effect, new fonts, icons, glyphs, and the Oh My Posh prompt, PowerShell in Windows Terminal looks beautiful.

  • How to Customize Windows Terminal Like a Pro
How to Customize Windows Terminal Like a Pro

Customize WSL/Ubuntu in Windows Terminal With Oh My Posh

Once you have added the Acrylic effect and installed the fonts, it’s time to customize WSL with Oh My Posh. Here is how to go about it.

1. Open Windows Terminal with admin privileges.

Customize PowerShell in Windows Terminal With Oh My Posh

2. Next up, move to WSL (Ubuntu or any other distro that you have installed).

Customize WSL/Ubuntu in Windows Terminal With Oh My Posh

3. Now, before we install Oh My Posh, we recommend updating WSL to the latest packages and dependencies. You may have to enter WSL’s password to confirm the installation.

sudo apt update && sudo apt upgrade -y
Customize WSL/Ubuntu in Windows Terminal With Oh My Posh

4. After that, run the below commands one by one to install Oh My Posh in WSL to enable yourself to customize Windows Terminal. You will have to press “y” to allow the installation.

sudo wget https://github.com/JanDeDobbeleer/oh-my-posh/releases/latest/download/posh-linux-amd64 -O /usr/local/bin/oh-my-posh
sudo chmod +x /usr/local/bin/oh-my-posh
Customize WSL/Ubuntu in Windows Terminal With Oh My Posh

5. Next up, run the below commands one by one to download the themes.

mkdir ~/.poshthemes
wget https://github.com/JanDeDobbeleer/oh-my-posh/releases/latest/download/themes.zip -O ~/.poshthemes/themes.zip
unzip ~/.poshthemes/themes.zip -d ~/.poshthemes
chmod u+rw ~/.poshthemes/*.json
rm ~/.poshthemes/themes.zip
Customize WSL/Ubuntu in Windows Terminal With Oh My Posh

6. Having done that, execute the below command to check if the custom prompt is installed properly. This should bring up the new Oh My Posh prompt.

eval "$(oh-my-posh --init --shell bash --config ~/.poshthemes/jandedobbeleer.omp.json)"
Customize WSL/Ubuntu in Windows Terminal With Oh My Posh

7. Now, to set Oh My Posh as your default prompt in WSL, run the below command. It will allow you to edit the Bash config file in Nano editor.

nano ~/.bashrc
Customize WSL/Ubuntu in Windows Terminal With Oh My Posh

8. In the Nano editor, scroll down using the keyboard arrow keys and look for this line “make less more friendly for non-text input files, see lesspipe(1)”. Right below it, you need to replace the command beginning with “eval…”.

Customize WSL/Ubuntu in Windows Terminal With Oh My Posh

9. Now, you need to type the below command in the Nano editor since it does not support copy and paste. It will look like this:

eval "$(oh-my-posh --init --shell bash --config ~/.poshthemes/jandedobbeleer.omp.json)"
Customize WSL/Ubuntu in Windows Terminal With Oh My Posh

10. After that, press “Ctrl + O” and hit Enter to save the changes. Next, press “Ctrl + X” to exit the Nano editor.

Customize WSL/Ubuntu in Windows Terminal With Oh My Posh

11. Finally, run the below command to reload the Bash profile. From now on, the WSL will load in the Oh My Posh prompt. Enjoy!

. ~/.bashrc
  • How to Customize Windows Terminal Like a Pro
How to Customize Windows Terminal Like a Pro

12. In case there are some glitches in rendering the glyphs and text, make sure you have set the right Caskaydia Cove Nerd font for Ubuntu/ other distros in the Settings page of Windows Terminal. This is one of the first things you need to customize in the Windows Terminal.

Customize WSL/Ubuntu in Windows Terminal With Oh My Posh

13. If you are still facing the issue, you need to reload the Bash profile every time you enter the WSL shell. Run the below command and everything will be fixed. You can also restart your PC to check if the issue has been fixed.

 . ~/.bashrc 
Customize WSL/Ubuntu in Windows Terminal With Oh My Posh

Make Your Windows Terminal Look Beautiful With Oh My Posh

So that is how you can customize Windows Terminal and make it look advanced and beautiful with icons, glyphs, acrylic effect, and more. As for the Command Prompt, we did try making it work with Clink but were unsuccessful. Anyway, that is all from us. If you want to further personalize Windows Terminal with themes, background images, and colors, follow our linked article. And if you have any questions, let us know in the comments section below.